
For our next project we got to use a light sensor, LED and a servo motor at once. When the light sensor sensed bright light, the LED would flash with a certain frequency. When the light sensed dimmer and dimmer light, the LED would flash with an increasingly smaller frequency and the servo motor would move to a different spot.
The Setup
 |
| The blue lego piece near the keyboard is the light sensor |
The Code


The Video
It's hard to tell in the video, but as I take my hand away from the photocell, the servo motor moves to a slightly different position.
On class on March 10, we got a new project set to start working with sciborgs. The first part of the project was learning how to make functions. We found out how to make an led flash SOS in Morse code using a function. A function allowed us to use less code and make writing the code much less repetitive.

We then had to make part of our sciborg, which was fun! We needed to complete some of the installation and solder the batter pack together. Then we needed to work with the sciborg starting with a "single motor" sketch. This sketch allows one motor to run forward for a couple seconds, and then backward for a couple seconds.

Then we deleted all of the extraneous code which was all the code that wrote any words in the sketch. After, we added a second motor to the sketch so they both would run at the same speed.

After that, we made both motors run at speed 0 and 1. The wheels would not turn at that speed because there wasn't enough power diverted to the wheels to make them run.

We found that the minimum speed that allows our sciborg to move was 54. This made the sciborg move very slowly.

Then we made the sciborg make a sharp turn by making one motor move at full power forward and the other motor move at full power backward.

After that we wrote a sketch to implement gentler turns. Our way was to have a series of 3 smaller turns for a short amount of time. In between each smaller turn was a short period of time where the sciborg went straight. The sciborg had a short turn, straight, short turn, straight, short turn, each for a time of half a second. Another way to implement a soft turn would be to have the turns at a small speed for a longer amount of time.

Video
After that we need to write a sketch to make the sciborg travel 10 ft and then stop. We did this by observing the time it takes for a sciborg to move 10 ft, 10.25 seconds, and then only allowing the sciborg to go forward for 10.25 seconds.

As you can see, the sciborg didn't move in a straight line, so I needed to keep it on track with my foot. This brought us to our next challenge, making the sciborg move in a straight line. We did this by making the motors move at different speeds relative to one another. Motor 1 moves at speed 242, while Motor 2 moves at speed 240.

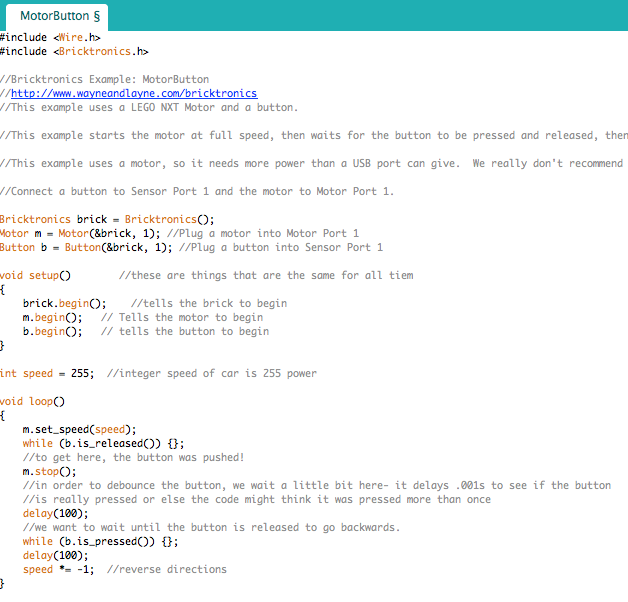
Then we needed to use the "motor button" sketch. This sketch makes the car travel in a straight line until the touch sensor gets pressed, then the car will move in the reverse direction. There is a section in the sketch where the car stops for .01 of a second. This is to debounce the button. It does this to make sure the button really got pressed down. Otherwise the code might think the button was pushed down more than once.
After, Paige and I needed to rewrite the code so that the sciborg would travel forward until it hits a wall, then it would back up and turn a bit, then continue on it's way.

Video
In order to optimize the code, we needed to adjust the time the car would turn for to make sure it didn't turn a large amount. We only wanted the sciborg to turn about 90 degrees so it could explore the room. We also put the sensor on the sciborg with legos. However, the legos were very unstable and would pop off the sciborg sometimes. It would work better if the sensor was permanently attached to the sciborg. It would also be helpful to change the code so the sciborg moves in a straight line as it moves around.
Nice work! most of the codes are well commented which made them easy to follow. It would be helpful if the rest were commented as well. keep it up:)
ReplyDelete